Products
Professional Services
Demos and Downloads
Help and Support
Products
Professional Services
Demos and Downloads
Help and Support
 The Layer List.
The Layer List shows you a complete list of the layers that you have loaded into your project and allows you to manipulate those layers to control the appearance of your map. As described in the article Building a Map with Layers, a layer is a container for geographic data that is alike. For example, you might have a layer containing roads, another containing rivers and still another containing cities.
Layers are listed in the order in which they are drawn on your map. Layers at the bottom of your layer list will be drawn first, followed by the layers above them. This means that the layer at the top of your layer list will be displayed on the map above every other layer, and that other layers may be partially or entirely covered up by it. For example, if you had two layers – one containing country landmass polygons and another containing major roads – you would want the major roads layer to be on top of your county landmass layer. Otherwise, the roads would be drawn beneath the landmasses and would therefore not be visible.
Each layer is placed into a Layer Group and just like layers, they can be organized and ordered. In the above example, we had two layers: one representing country landmass polygons and one containing major roads. Well, if you had several different road layers, you may want to add them to the same layer group and place it above your country landmass layer so all roads will be drawn above the landmasses.
By default, the Layer List is docked to the left side of the GIS Editor's main window. You can reposition it by dragging it, resize it by dragging its borders, or even set it to auto-hide by clicking the pin icon at the top of the list.
Each layer shown in the layer list is represented by a bar that contains:

In addition to these controls, you can interact with each layer bar in the following ways:
Styles control the appearance of a layer's features when they are drawn on your map. Styles govern everything from the color and thickness of shape outlines to the font and size of labels.
Adding a style to a layer can be done in one of two ways:
This will open the Style Builder where you can create a custom appearance for your layer.
All of the styles that have been applied to a layer can be shown on your layer list. To display styles, you'll need to toggle the layer so it is in the expanded state. You can do this by clicking the arrow button on the right edge of the layer bar. An expanded layer looks like this:
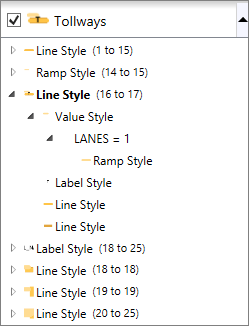
The drop-down panel beneath the layer bar contains a tree control of all the styles assigned to that layer. Because styles can be composited together, it's possible to expand and collapse individual style containers on the list to see all of their component pieces. Styles are listed in order from those that are visible at the lowest zoom levels (i.e., when you are zoomed out to the furthest possible extent) to those that are visible at the highest zoom levels (i.e., when you are zoomed in very close).
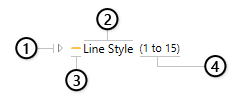
A typical line on the style tree control contains the following elements:
To make changes to any style attached to a layer, double-click on it (or right-click on it and choose “Edit”) to load it into the Style Builder. You can delete a style entirely by right-clicking on it and choosing “Delete”.
Right-clicking on a layer bar opens the layer context menu, which contains the following options:
View Data - Opens the View Data window and displays the data table for the layer. The layer's data table is similar to a spreadsheet and lists every feature in the layer as well as its attribute data.
Move up / down / to top / to bottom - Changes the position of the layer on the layer list, which in turn controls the order in which layers are drawn on your map.
Zoom to extent - Centers the map on the layer and zooms to a scale at which every feature in the layer is contained within the map window.
Select Layer - Sets the layer to be the active layer to use in the Select Features Tab.
Rename - Changes the name of the layer. (This does not change the name of the layer's source data file, if any.)
Remove - Removes (unloads) the layer from the map.
Edit Layer - Opens a flyout menu that sets the layer to be the active layer to edit in the Edit Tab and also lets you cancel all edits made, save edits made, or stop editing the layer.
Add Style - Opens a flyout menu from which you can directly choose the type of style you want to add to the layer, load a style from the Style Library, or use the Style Wizard to pick an appropriate style.
Drawing Margin - An advanced setting that determines how far beyond the boundaries of a map tile to draw features from this layer. Each map is drawn as a series of square tiles, and in some circumstances a layer's features or labels may appear cut off if the feature is located too close to the edge of a tile. Increasing the drawing margin reduces the likelihood of features or labels being cut off, but also decreases the drawing performance of the map.
Rebuild Index - Immediately rebuilds the index for the layer, if applicable. The index is a special file used by certain types of data sources that greatly improves the performance of drawing, locating and editing features. When you add a layer to your map, if it does not have an index, the GIS Editor will ask if you want to build one. Once this is done you should not have to build the index again; however, if you then modify the layer's data file outside of the GIS Editor, you may need to rebuild its index manually.
Export as code - Generates C# code that can be used to create the layer (as well as its styles) programmatically. Useful for .NET developers who are working with the Map Suite .NET controls from ThinkGeo.
Layer Projection - Modifies the internal projection used by the layer. This information is stored within the layer data and informs the GIS Editor what projection it should use to draw the layer. This should not need to be changed unless the layer's internal projection has been set incorrectly. The result of an incorrectly set internal projection is that the layer will not draw as expected (or in the expected location), or it may not appear at all.
Properties - Opens the properties sheet for the layer, which lists information such as the path and filename of the layer's data source, the number of features it contains, the coordinates of its upper left and lower right points, etc. The properties sheet is also where you can change the character encoding for the layer's data, which you may need to do if the layer users non-roman characters and they are not displaying properly.
Export To… - Exports the layer into a new file type, either Shapefile, TinyGeo, Delimited, or FileGeodatabase formats. Exporting a layer also lets you modify its projection settings using the Map Projection tools.
Transparency - Sets the transparency level for the layer from 10% to 100%. At 100%, the layer is fully opaque (not transparent). At 10%, the layer is just slightly visible. This setting controls the transparency for the entire layer as a whole, and works in combination with any transparency you may have applied to features on the layer using styles.
![]()
8501 Wade Blvd Ste 550
Frisco, TX 75034
United States
sales@thinkgeo.com
1-785-727-4133
Online Store
- Desktop
WPF
WinForms
- Web
WebAPI HTML5/JavaScript
ASP.NET MVC
WebForms with AJAX
- Mobile
iOS
Android™
World Street
World Imagery
Routing
Geocoding
Reverse Geocoding
Elevation
Quick Start Guides
Documentation
Blogs
Discussion Forums
Customer Portal
About Us
News & Announcemets
Privacy Policy
Copyright 2003-2017 ThinkGeo LLC.
All rights reserved.