Table of Contents
Working with Multiple Maps
Unlike most GIS software, the Map Suite GIS Editor allows you to work with multiple maps within a single project. Maps are represented by tabs in the main application window, and you can seamlessly switch between maps at any time by simply clicking on the corresponding tab. Each map has its own distinct set of layers, styles and other information, meaning that you can create a single GIS Editor project to store an entire series of related maps and quickly compare them against each other.
Video Overview
Map Tabs and Multi-Map Controls
Above your map window is the Map Tab Bar, and at the far right side of this are the Multi-Map Controls. The bar consists of the following elements:
- The map tabs, with one for each map in your project. Clicking one of these tabs displays the corresponding map in your map window.
- The map list button allows you to see all available maps in a dropdown list. Clicking one of the maps in the list will display it in your map window.
- The delete map button removes the currently selected map (and its resources, like layers) from your project.
- The add map button adds a new blank map to your project.
Changing the Currently Visible Map
To switch to a different map, simply click on the corresponding tab from the map tab bar. You can also click the “down arrow” button at the far right edge of the map tab bar and then select the map you want to see from the dropdown list.
Adding a New Map
To add a new map to your project, click the “+” button at the far right edge of the map tab bar.
Deleting a Map
To delete the map you are currently viewing, click the “x” button at the far right edge of the map tab bar. You will be asked to confirm your request so that you don't accidentally delete a map.
Renaming a Map
To rename the map you are currently viewing, right-click anywhere on the map and choose “Rename map”. You can also rename a specific map from the Map List panel. Please note that map names can only contain letters, numbers and underscores (_).
Map List Panel
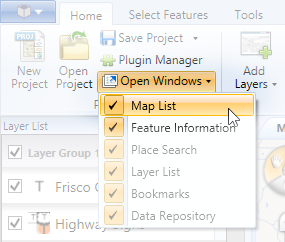
The Map List panel is a dockable window (much like the Data Repository) that serves as a list of all the maps in your project. If the Map List panel is hidden, you can get it back by clicking the “Open Windows” button on the Home tab of the GIS Editor's ribbon bar, then choosing “Map List” from the dropdown menu that appears.
The Map List panel lists all of the maps in your current project and allows you to perform simple actions on them, including adding, deleting and renaming a map. Simply right-click on any map in the Map List to bring up a context menu that will let you perform any of the above actions.

