Table of Contents
GIS Editor Lesson 7: Geoprocessing
There are many options for combining, subsetting and modifying the shape of your map features depending on various conditions. For our ongoing example project, we will be doing a Dissolve on the joined US States layer in order to get 6 or 7 sales territories (for example: Northwest, Southwest, South, Southeast, Midwest, Northeast). This will be a new layer that we add to the map.
Geoprocessing
Geoprocessing is a way to manipulate data in a geospatial aspect. Geoprocessing is useful for an array of tasks. For our purposes today we will split our sales data into sales region. This will be useful for analyzing data by region and visualizing regional splits.
Locating the Geoprocessing Tools
All of the editor’s geoprocessing tools can be found under the tools tab in the ribbon. For our purposes today we will use dissolve, but dissolve isn’t the only options you have as a developer. The Editor also comes with options such as
• Buffer-The Buffer Wizard dialog is used to expand the bounding region of the features in a layer. This creates a “zone” around the features at a specified maximum distance from all the vertices of the features. Buffering is useful for proximity analysis. http://giseditorwiki.thinkgeo.com/w/Buffer_Wizard
• Simplify-The Simplify Wizard dialog is used to reduce the complexity of line or polygon shapes. The overall shape will be retained while smoothing out corners and consolidating points. This is a good wizard to use if your data is rendering slow due to very complex shapes with many vertices. http://giseditorwiki.thinkgeo.com/w/Simplify_Wizard
• Blend-The Blend Wizard dialog is used to combine area features from multiple layers. Blending will overlay all of these features on top of each other, with the borders of each feature defining the shape of the new sub-features. The result is a single new layer. http://giseditorwiki.thinkgeo.com/w/Blend_Wizard
• Dissolve-The Dissolve Wizard dialog is used to simplify a group of features. Dissolving is a process by which multiple features are combined into a single feature if they have matching values in the column(s) you specify. http://giseditorwiki.thinkgeo.com/w/Dissolve_Wizard
• Clip-The Clip Wizard dialog is used to selectively remove portions of a master layer based on an extent. This is done by selecting one or more clipping layers, the combined extent of which will be used to “cut out” a portion of the master layer beneath them. http://giseditorwiki.thinkgeo.com/w/Clip_Wizard
• Merge-The Merge Wizard dialog is used to merge together several different layers into a single layer. This does not alter any of the features in those layers, it simply copies all of them into one new layer. This wizard is helpful when combining similar data from multiple data sources. http://giseditorwiki.thinkgeo.com/w/Merge_Wizard
• Split-The Blend Split dialog is used to divide one layer into multiple layers based on the data values. Within the column you select, features representing each distinct value will be split into their own file and added to your map as a separate layer. http://giseditorwiki.thinkgeo.com/w/Split_Wizard
• Grid-The Grid Wizard interpolates the data from a point-based layer. The resulting grid file represents the same space as a grid of equally sized squares, which can then be styled appropriately. http://giseditorwiki.thinkgeo.com/w/Grid_Wizard
Dissolve Wizard
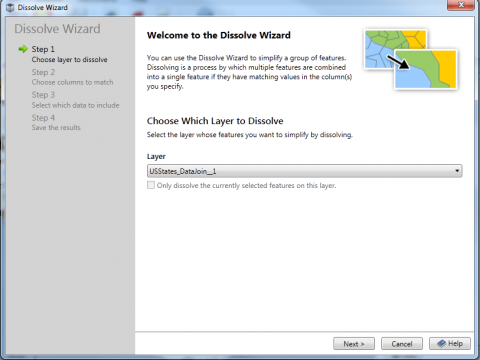
After opening our project we will want to locate the dissolve application under geoprocessing in the tools tab as mentioned earlier. Once you click on dissolve the wizard will appear to help us set up our data and display it in our project.
• Step One- In this step the wizard will have you select which layer you are wanting to use to dissolve. We will use “USStates_DataJoin_1” ( This was the default name given to our layer we created in lesson 3, If you renamed yours, select that file).
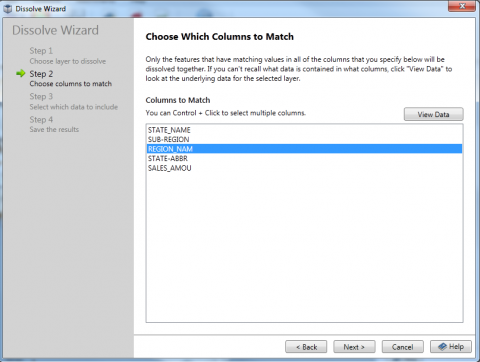
• Step Two-Now we will select the data that will be dissolved. In our case we will select “REGION_NAM”. By selecting this column the wizard will combine all states that have this as a region thus creating our regions.
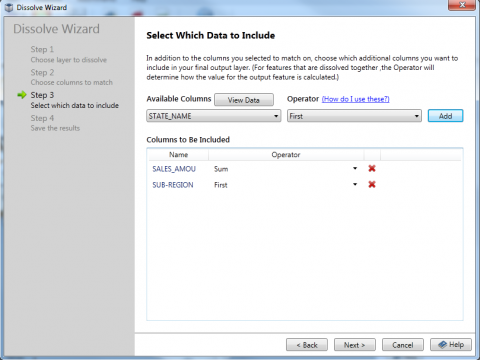
• Step Three-In addition to the columns you selected in step 2, Step 3 allows you to add additional columns to be included in your final output layer. The additional columns are a combination of a column from the original data and an Operator that will select how you want the data added or aggregated.
We are going to have two outputs for our dissolve layer. The first is sub-region, and second is sales amount. For our first output, select the sub region option and set the operator to first. Now add the second, but unfortunately we run into a problem. There is not a sum option for our sales amount. This is because our data type is set as a string instead of numeric. Therefore, to complete this option we have to cancel the wizard and change our data from string to numeric.
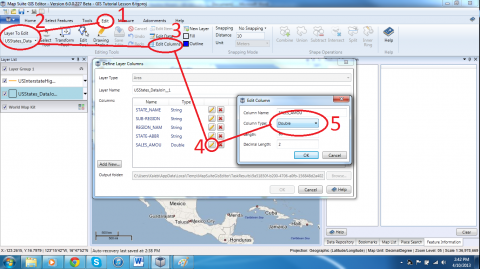
1. Find Edit tab in the ribbon, located next to tools.
2. On the left hand side of the ribbon, select the data layer you wish to edit. Which is “USstatesData_Join_1”
3. Now click on “Edit Columns” this will take you to a new dialog box where we can edit out column data type.
4. Locate “Sales Amount” and click on the edit button (looks like a pencil).
5. Under the “Column Type” drop down box select “Double” and if it is not already set change decimal to “2”.
Now that our Data is numeric, we may start the wizard again and once your data is set proceed to step four.
• Step Four- In this step you can add it to your map or save it to your disk. Either way will add the layer to your map.
Now that the Editor has added the new layer you can see all the different sales regions, and by using our identify feature you can view the data. In our next tutorial, we will style this layer and add class breaks. You can now save the project and head to our next lesson.
Continue to:
Advanced Styling
Or return to the index of all lessons.


